

Stacking stars Christmas tree tutorial (+Free template)

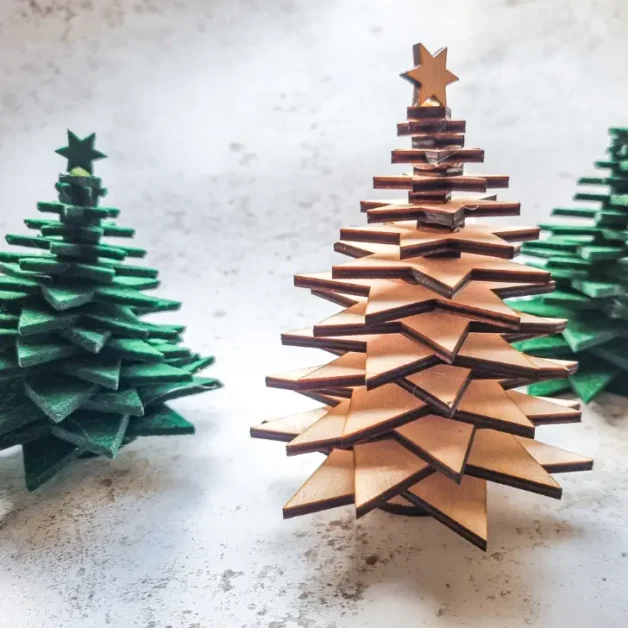
I love a diy Christmas décor and I’m in love this these stacking stars Christmas trees! Choose to make them from wood or felt and see how easy they are to assemble. Follow my stacking stars Christmas tree tutorial to make your own and don’t forget to download the free svg template to make it so simple!

Choosing Your Canvas: Plywood or Felt?
- Plywood – Sturdiness and Durability:
- Opting for plywood adds a robust and durable element to your Christmas tree, ensuring it stands tall throughout the festive season.
- Stick with a natural finish or paint it any colour to like!

- Felt – Softness and Versatility:
- Felt brings a different dimension, offering a soft and warm canvas for your Christmas tree.
- Ideal for indoor displays, felt allows for a more flexible and lightweight construction, making it easy to handle and store.

Crafting Your Stacking Stars Christmas Tree
Materials Needed:
- Stacking Stars Christmas Tree Free SVG file
- Cutting machine (e.g., Cricut or Silhouette or laser cutter) Don’t worry if you don’t have a machine. You could cut the felt stars with fabric scissors.
- 3mm Plywood sheet (for a sturdy finish) or Green 3mm Felt sheet (for a softer touch)
- Sandpaper (for plywood)
- Coloured paint or wood stain (for plywood optional)
- Paintbrush (for plywood optional)
- Hot glue gun
Step 1: Download Your Free SVG Template
Start by downloading your free Stacking Stars Christmas Tree SVG template. You can find it at the bottom of this post. Choose your material and consider a natural finish or painted for the plywood or select a range of vibrant felt colours.
Step 2: Prepare the Plywood or Felt
- For Plywood: Cut the plywood sheet to fir your machine
- For Felt: Cut the felt sheet to fir your machine
Step 3: Load the SVG File into Your Cutting Machine
Use your cutting machine software to load the SVG file. Adjust the size according to your chosen material dimensions.
Step 4: Cut the Stars
- For Plywood: Load the coloured plywood into your cutting machine and let it cut the stars. Be sure to follow the machine’s specifications for cutting thicker materials.
- For Felt: Similarly, load the coloured felt into your cutting machine and let it cut the stars.
Step 5: Assemble the Tree
- For Plywood: Start assembling the tree by layering the plywood stars and spacers from the largest to the smallest. Use hot glue gun glue to secure each star in place using the engraved markers to help line it up, creating a beautiful cascading effect. Finish with the top star stood upwards.
- For Felt: Arrange the felt stars in a similar fashion, securing them with hot glue for a softer, more flexible construction.
Step 6: Personalize and Decorate
Add a personal touch by incorporating additional elements or painting details on the plywood. For felt, consider embellishments like sequins or fabric paint to enhance the festive look.
Download the stacking stars Christmas tree template here
Love this free SVG?
Explore even more creative designs in my Ko-Fi shop! Discover a treasure trove of unique projects, sublimation and SVG’s that will inspire your next project. Visit my shop now to unlock endless creative possibilities.
Christmas crafter personality quiz

What type of Christmas crafter are you? Are you an early bird or a colourful creator? Take this fun Christmas crafter personality quiz and find out who you are!






HI, I have a question about doing this craft. I would like to make one with using felt, but I don’t have a Cricut machine. Can you suggest any other way to make this?
Thank you Rita
You could just print out the templates, draw around them on to felt and cut them out by hand with scissors.