FREE Happy elephant cross stitch pdf pattern

Don’t like ad’s or scrolling? Buy the pattern in my ko-fi shop.
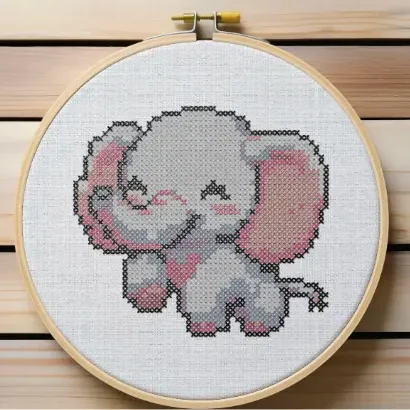
Today I’m sharing with you my adorable Happy Elephant Cross Stitch design that’s perfect for beginners. Whether you’re a seasoned stitcher or just starting out, this pattern is sure to delight!

Pattern dimensions:
- Grid Size: 52W x 47H
- Design Area: 3.71″ x 3.36″ (52 x 47 stitches)
Why Choose the Happy Elephant Pattern?
- Easy and Quick: This delightful elephant design is ideal for beginners. With a simple grid size of 52W x 47H, it stitches up quickly, making it a satisfying project for both new and experienced stitchers.
- Cute and Versatile: The baby elephant motif adds a touch of sweetness to any project. Use it to create greeting cards, nursery décor, or even embellish clothing. Imagine a tiny elephant stitched onto a baby onesie—adorable, right?
- Printable PDF Chart: You can download the printable PDF chart directly. No need to wait—it’s ready for you to start stitching!
Materials Needed
Before we dive into the stitching process, gather the following materials:
- Aida Fabric: Choose a 14-count Aida fabric in your preferred colour. The standard white or light grey works beautifully for this pattern.
- Embroidery Floss: You’ll need DMC embroidery floss in various colours. Refer to the colour chart provided in the PDF.
- Needle: A size 24 tapestry needle is perfect for cross stitch.
- Embroidery Scissors: Sharp scissors for trimming threads.
Stitching the Happy Elephant
- Download the Pattern: grab the Happy Elephant Cross Stitch PDF. It’s free and exclusively available to subscribers.
- Prepare Your Fabric: Cut your Aida fabric to the desired size. Remember to leave a 2 inch border around the design area.
- Thread Your Needle: Separate the embroidery floss strands (usually 1 strand, doubled for the loop method) and thread your needle.
- Start Stitching:
- Begin at the centre of your fabric.
- Follow the chart, stitching each square according to the colour key.
- Use full cross stitches (X-shaped stitches) for the solid areas.
Frame or Use as Desired:
- Frame your finished piece for display.
- Turn it into a card or a small ornament. You could also check out 35 Alternatives to framing cross stitch
Download the pattern here